

Flight managment has always been somewhat of an overlooked topic for flight simulation addons. They don’t have the glamour or wow factor of a new plane/scenery, nor do they have the groundbreaking features of a brand new sim. Yet, out of this criminally underlooked category of innovative and important addons, one managed to catch my eye, and proceed to make me re-evaluate how I use my flight sim. That addon, was the wonderful FS-Flightcontrol, for FSX, P3D, FSW, and XP 10/11 (although we’ll only be using this with P3D due to length reasons. I will follow up this article with an XP extension if the need arises.)
The addon essentially aims to take everything good from GSX, Chaseplane, PFPX, Aivlasoft EFB, and condense it all into one easy to use application. From a robust included moving map, to detailed aircraft positioning, real time failures and weather updates, along flight planning and pushback, this addon truly has it all (including a special feature that we’ll talk about later.) The only question is, how good can an all in one application really be?
The way we are going to detail this addon is simple. I will go through each “tab” in the program, and explain all of the features within that tab, how they were, and how much I used them. Without further stalling, let’s get into the review!
WARNING: THIS REVIEW IS LONG, if you want to learn about a specific function, look for the bold name of it. If you want to just get a general idea of what this program can do, feel free to just skim over it. If you seriously consider buying this product though, I highly encourage you read the whole thing. Even though this review is long, it is dense with information.
POSITION TAB
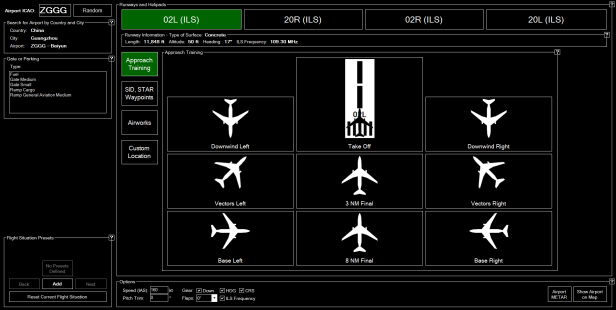
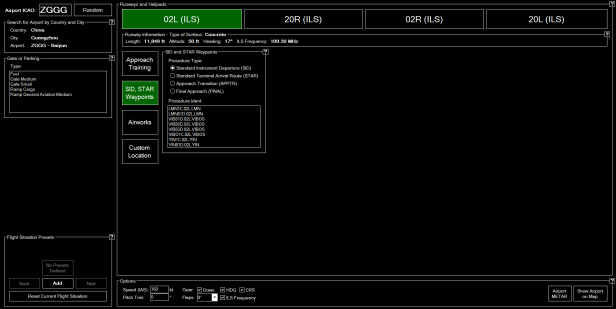
The position tab in the application is dedicated to positioning your airplane in the air. In the top left corner you can type in the ICAO code of the airport (either by keybord or on screen A-Z keyboard if that’s more your speed.) The application will then produce the name, city, and country of the airport in question. Below that, a box exists that lets you choose a gate simply by its in-sim type (fuel, medium, small, cargo, GA, etc.) The the right of those you have a list of runways at the airport that you can switch between. This will select which runway you are lined up with. Below the selected runway, the application will display the runway’s length, altitude (ASL,) heading, and ILS frequency. Below that box of info, we get into the real functionality of this page, the aircraft positioning system. By default, the positions you have available to you are under the “Approach Training” tab. On this tab, you have the option to choose between a Left and Right downwind leg for the runway, left and right vectors, left and right base legs, and a 3nm and 8nm final approach position. We can choose the next available tab below “Approach Training” to reveal the ability to position your aircraft on a specific point in a SID, STAR, on a waypoint, or on an approach transition. This system is mindbogglingly versatile, and lets you practice almost every approach/departure procedure on the planet, just with the click of a button…
But we still have two more tabs left of position options.
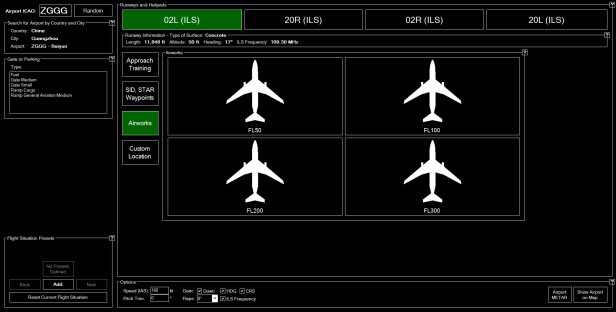
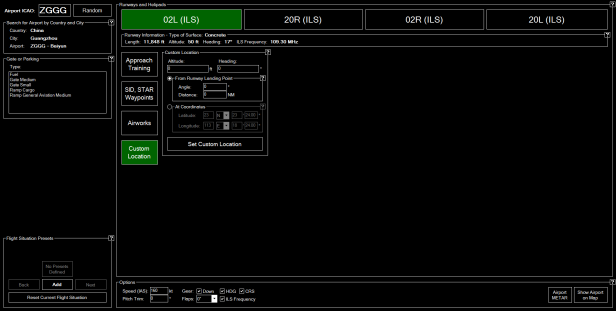
We can click the next tab, titled “Airworks” to reveal the ability to place your airplane at a specific flight level (050, 100, 200, and 300.) The final tab (last certainly isn’t always the worst) is titled “Custom Location.” In this menu, you can select just a random altitude and heading (and you will be raised from your current position,) or you can choose an angle and distance from the landing point of the runway you have selected from before. You can also just place yourself at a specific set of co-ordinates on the globe, if you truly want to get lost.
Below all of these different positioning tabs and options, you have a proper options menu. In this options menu, you can select how you want your airplane configured upon placing it through the above module. You can set the target IAS, pitch trim, gear setting, HDG bug, CRS bug, whether or not the ILS frequency is pre-tuned, and the flaps angle. From this little options menu you can also zoom directly to the airport in question on the built in application map, or grab the current airport METAR. Now, if you managed to troop through all of that without being impressed, don’t worry. We have 12 tabs left.
I would however, be remiss if I didn’t explain a few issues I did have with this function. Although for the most part it worked flawlessly, I would ocasionally run into the fact that the data FS-Flightcontrol was using is old, and in some airport, that meant missing runways, misaligned Finals placement, and flat out wrong gate placement.While I’m sure there would be a way to update this data, I personally never was able to figure it out, and as such, was stuck with the old data. I will update this article if I find a solution to this problem.
MAP TAB
My favorite feature (and the one I certainly use the most) is the map tab. Upon opening this tab, you are greeted by a massive map of your airplane’s current position. You will immediately notice that if you are parked at an airport, the airport has a fully modeled map of the airport taxiway/runway structure, and displays all of the gates and their numbers on top of that. This is so insanely useful for figuring out taxi-routes on your own, as well as for deciding on a good parking gate, and understanding positions of people on VATSIM (more on that later.)
Now this itself would be nice and fine and dandy, but there are plenty of options to cover with this map, as I will now detail. We can start at the top left corner where we have a box labeled “User.” This button will let you toggle between removing you from the map, showing you as just a black plane icon, or a black airplane icon with a small info blurb. Below the User button, we can toggle whether AI airplanes appear in the same fashion as the user. Below that button, we have 3 self-explanatory buttons, labeled VATSIM, IVAO, and PilotEdge. These options overlay current traffic on the network into the map, even if you aren’t connected to the network.
We can also enable/disable airports, runways, ILS visualizations, Axis, Markers, Taxiways/parking spots, VORs/DMEs, NDBs, and Airspaces. We can also enable/disable High/Low Airways, Waypoints, weather stations, and User-Made points of interest. Yes, you read that right. You can annotate this map with points of interest, placed exactly by you.
On the right side of the screen, we have more options to do with this map. We can toggle between a Google Streetmap style of terrain map (including roads, town names, etc) and Satellite based imagery. You can also select a height map if you want to avoid tall mountains in GA. The next button is quite special, and I love it to death. It’s the “Find Object” button. With this button, you can search through the entire world for an Airport, a VOR/DME, NDB, waypoint, airway (both Jet and Victor) as well as weather stations, your own Points of Interest (as we detailed earlier) and even callsigns on VATSIM, IVAO, and PilotEdge.Once the application has found the object you’re looking for, you can show it on your map, or add it as a point on your flight plan (we’ll be covering flight-plans shortly.) Below the Find Object button, we have the flight plan mode button, which overlays your flightplan onto the map. Below those buttons, we have the option to Auto Zoom, manually zoom, set the map to always be centered on the aircraft, we can set the map to trace a line behind where the plane flew so you can review your overall flight path after the flight, and you can reposition your airplane. You can also enable weather info, measuer distances between points (no POI or otherwise important factor needed, just click and drag.) You can also enable a compass rose, and print the current look of your map (which works even if you set your default printer to onenote, hence just saving a screenshot of the map.)

FLIGHT PLAN TAB
The Flight plan tab is pretty self explanatory, you can make a route, import a route, export a route, sync your route between FS-Flightcontrol and the Aerosoft A320 MCDU, default FSX, etc etc. While having the capacity to be a full-fat flight planner, the way it was layed out made it very slow to use, and even if I had FS-Flightcontrol open, I would still rather open up SimBrief and plan my route that way. That still doesn’t stop me from then importing that SimBrief route into Fs-Flightcontrol so I can have an overlay of my route though.

CONDITIONS TAB
Under the conditions tab, you have access to a whole slew of options in relation to your sims weather. The first tab within the Conditions tab that you load into is the Current Weather tab, which lets you see the current METAR, a translation of it, and lets you inject RW weather into the sim, straight from FS-Flightcontrol. The next subtab is weather themes, which lets you select predefined weather themes in the sim, and load them into the sim. This process is blazing fast, and a really good indicator of how advanced this software really is. I could switch between everyone’s favorite “Fair Weather” to “Major Thunderstoms” in just over a second. A SECOND!
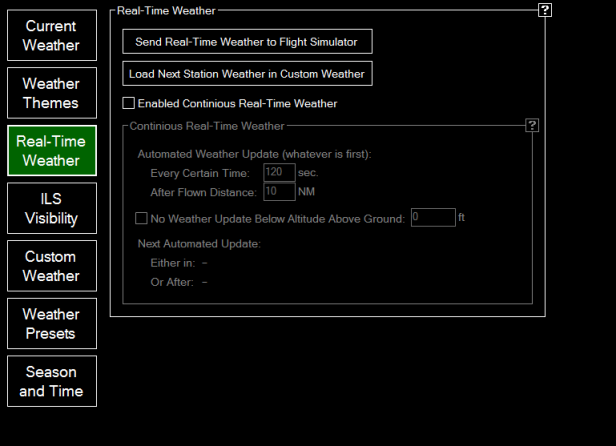
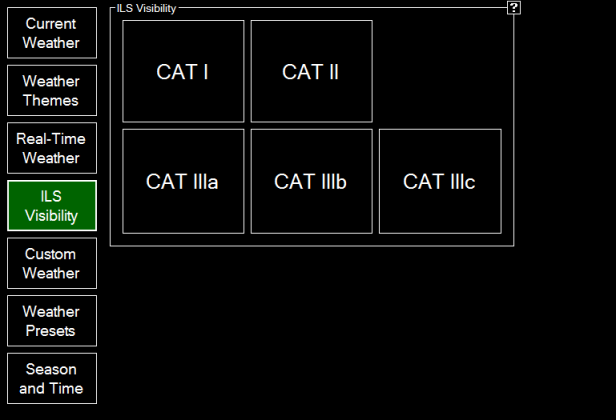
The third subtab is labeled Real Time weather, and lets you send real-time weather to the sim, and customize when and how it reloads. Although I cannot vouch for the accuracy of this weather injection, I found it easier to use than everything but FSXWX, and it had some highly customizable features that I don’t believe Active Sky has, like updating the weather ever 60 second/10NM, whichever comes first. The fourth subtab lets you set ILS CAT I, CAT II, or CAT IIIa/b/c fog conditions within the simulator, again, at a blazing fast pace.
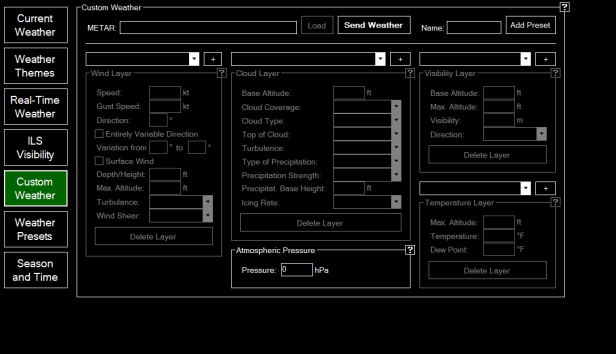
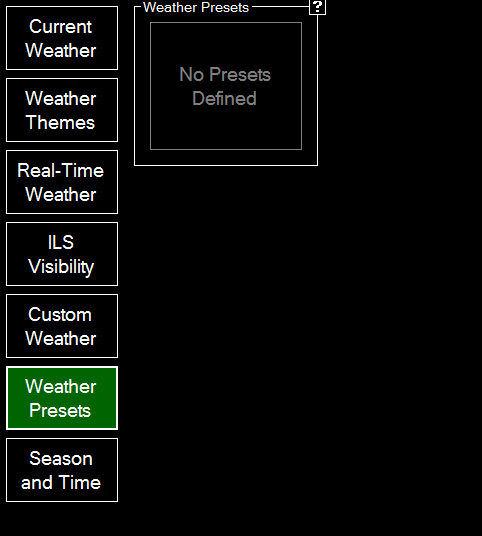
The fifth subtab lets you inject custom weather, either by inserting a METAR and then saving it as a preset, or adding and removing wind, cloud, and visibility layers to make a custom weather condition. 500kt winds and 0m viz? You got it! 0kt gust 50kt with wind variation from 360degrees to 090degrees with a separate surface wind, max wind shear and light turbulence, a cloud that insta-ices up your plane, and 10m visibility, all at 100 degrees Fahrenheit? You bet you can do it! This has to easily be the most malleable custom weather generator in all of the flightsim world. The 6th subtab lets you load in your custom presets you’ve made, and the 7th subtab lets you edit the in-sim season and time.


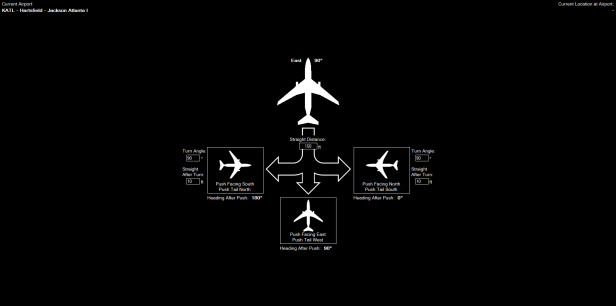
PUSHBACK TAB
This tab is fairly self explanatory. You get to choose how far you get pushed back straight, followed by which direction you want to turn to, followed by how far you want to go after the turn. While not as useful for lining up with taxiways as GSX is, it is a massive step up from the default FSX/P3D pushback system, and allows for a lot more customization than both GSX and default in terms of where exactly you want to get pushed back. Although I did tinker around with this function a little bit, I personally didn’t see the appeal, as someone who owns and uses GSX on a regular basis. However, I could definitely see this being an amazing tool for people who do not have GSX installed.
FUEL/LOAD
This tab allows you to add specific amounts of fuel to each tank on your airplane, and let you specify the payload weight, and where it is distributed (forward cabin, mid cabin, aft cabin, forward cargo, and aft cargo.) Additionally, since FS-Flightcontrol knows what your plane is, it calculates empty weight, ZFW, gross weight, max weight, and CG for you, all without even having to call for it. You can also freeze your current fuel level if that’s something you feel you need to do. I personally love this load manager, and I think it’s truly an understated highlight of this software. Every addon seems to have a different payload manager, and instead of having to memorize all of them, it is much simpler to memorize this one, simple system.

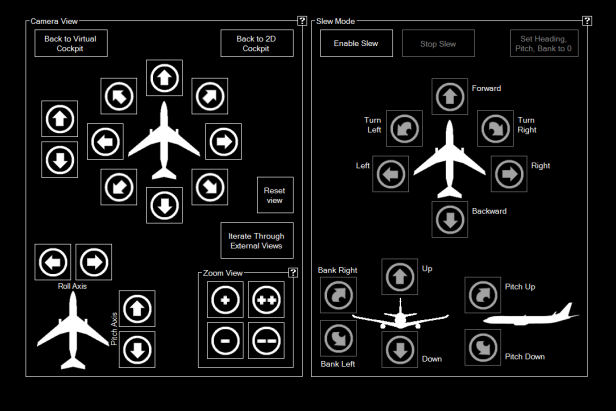
VIEW/SLEW TAB
This tab allows you to move the in sim camera in every which way imaginable, and lets you slew through buttons as opposed to key combos. Although not really useful for someone with Chaseplane/EZDok, I see this being useful for default FSX/P3D users though.
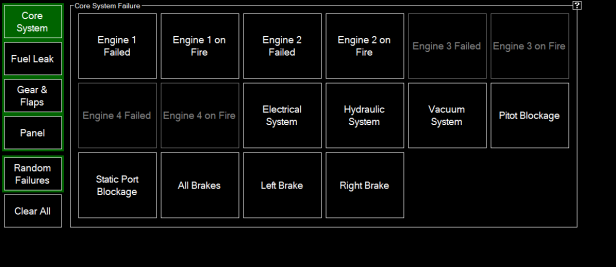
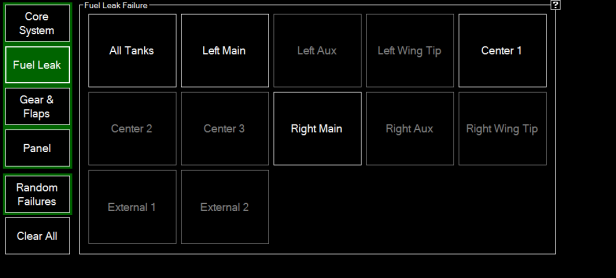
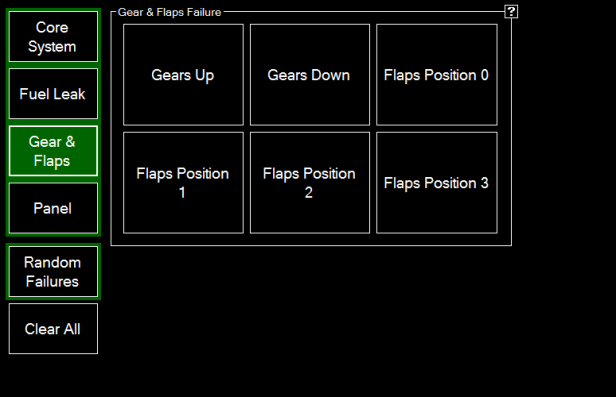
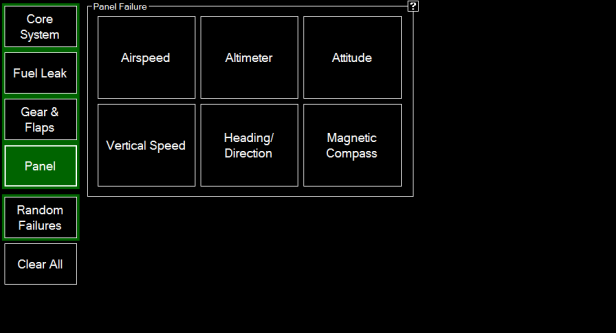
FAILURES TAB
The failures tab is a major selling point for this addon, and with good reason. It adds a robust failure system to your simulator, that works with all default planes, and a few select addon planes (and more to come with updates.) You can fail everything from engines to brakes to static port blockage to a fuel leak. I will say, with a compatible airplane, this feature was an absolute blast, and really helped me to practice any kind of difficult situation in conjunction with the other tools provided with this software. Ever wanted to fly into Innsbruck starting at the beginning of the STAR fully configured with a terrifying storm you conjured up and a leaking fuel system and pitot blockage? Have you ever wanted to do something like that and be able to set it up and just do it over and over again efficiently and without much setup at all? Yeah, I did too, and it was some of the best fun I’ve had in flightsim to date. It can even all technically be considered training with the landing analysis tools being used to evaluate how well you did (we’ll be touching on that in a bit.)
AIRCRAFT TAB
Hey! We’re finally on the second row of tabs! This is the aircraft tab, host to a vast array of information in regards to your airplane. It would be incredibly space inefficient to list everything this page shows you by text, so I will instead attach screenshots of every page, and you can look at the sheer amount of data this app is pulling.


STATISTICS TAB
The statistics tab is simple. It lets you analyze your flight by V/S over time, Airspeed over time, Aircraft altitude over time, and pitch/bank angle over time. You can also look at your approach statistics which give you localizer deviation over distance to runway, and G/S deviation over distance to runway. This tab is incredibly useful for analyzing your landing performance and understand how to improve your flying skills. I always check back to this tab after my landing to see how I did, and see what I could have done better. The landing page also shows you your V/S uppon touchdown, as well as pitch/bank angle and G-Force, another helpful tool for dissecting your landings.


THE REST OF THE TABS
The rest of the tabs are dedicated to networking, connecting to full motion simulators, and othe impressive features that are sadly beyond my reach, and meant more for instructors than a regular flightsimmer. If you want to read more about those functions though, the website has some fantastic overviews of what these functions do.
CONCLUSION
All of this information and all of these features may be hard to digest, so I will just quickly recap them. This software lets you use a high quality map, helps you practice approaches, lets you mess with weather conditions, gives you pushback, view, and slew features, a payload/fuel manager, and detailed statistics. This application has truly changed the way I sim, including one way that I have yet to cover. Remember the special feature I mentioned earlier? You can put this application on your iOS/Android device, and control all of these factors from your phone. Want to start a hurricane from the other room while watching T.V? I don’t know why you’d want to do that in particular, but you can. I can simply have my phone off to the side giving me a full moving map, and the ability to check up on the status of my airplane, all without alt tabbing. This, ladies and gentleman, is why I am nominating FS-Flightcontrol as THE BEST EFB addon. Period. The simple span of this addon is immense, the simple enormity of it’s functions cannot be expressed in a single article. This program is the definition of jam-packed with features, and I know that whoever purchases it will be incredibly happy with their purchase.
SPECS:
i5-6600k @ 4.2GHz, AMD RX 480 8GB, P3D v3, 16GB DDR4 RAM.
DISCLAIMER: THIS PRODUCT WAS PROVIDED TO ME FREE OF CHARGE FOR THE PURPOSES OF CONDUCTING A BATTERY OF TESTS FOR A REVIEW. MY VIEWS REMAIN UNTOUCHED BY THIS, AND I REMAIN UNBIASED IN MY REVIEWS. FOR MORE INFO ABOUT THIS, PLEASE CONTACT ME DIRECTLY.

Im very impressed with this addon. I also think i have a steep learning curve coming. Cant wait to get started, especially on the approaches tab.
LikeLike